
Two Festive Mini Watercolor Projects Using Just Two Colors
As the holiday season approaches, I love returning to small, calming projects. I especially love the ones that only need a few materials but still result in something beautiful and personal—like your own handmade watercolor Christmas cards. Even if you are short on time, these cards are so quick to paint that you can easily make them as a last-minute DIY gift.
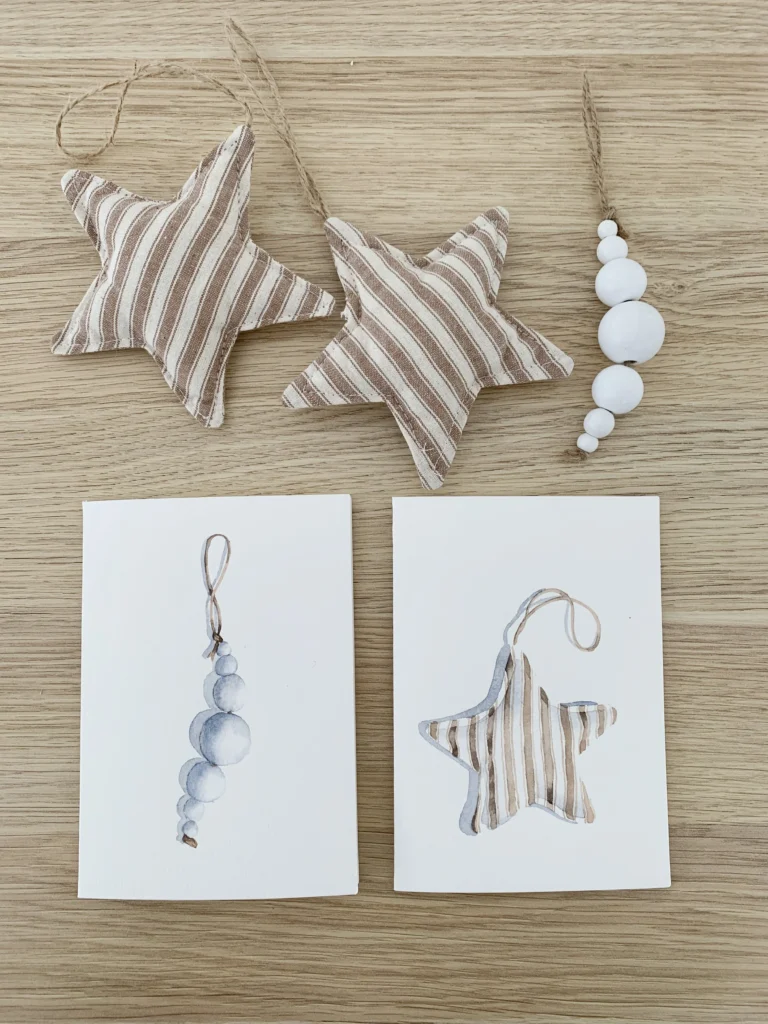
In today’s post, I’m sharing two holiday-themed card ideas to inspire you: a soft, striped star ornament and a string of wooden beads.
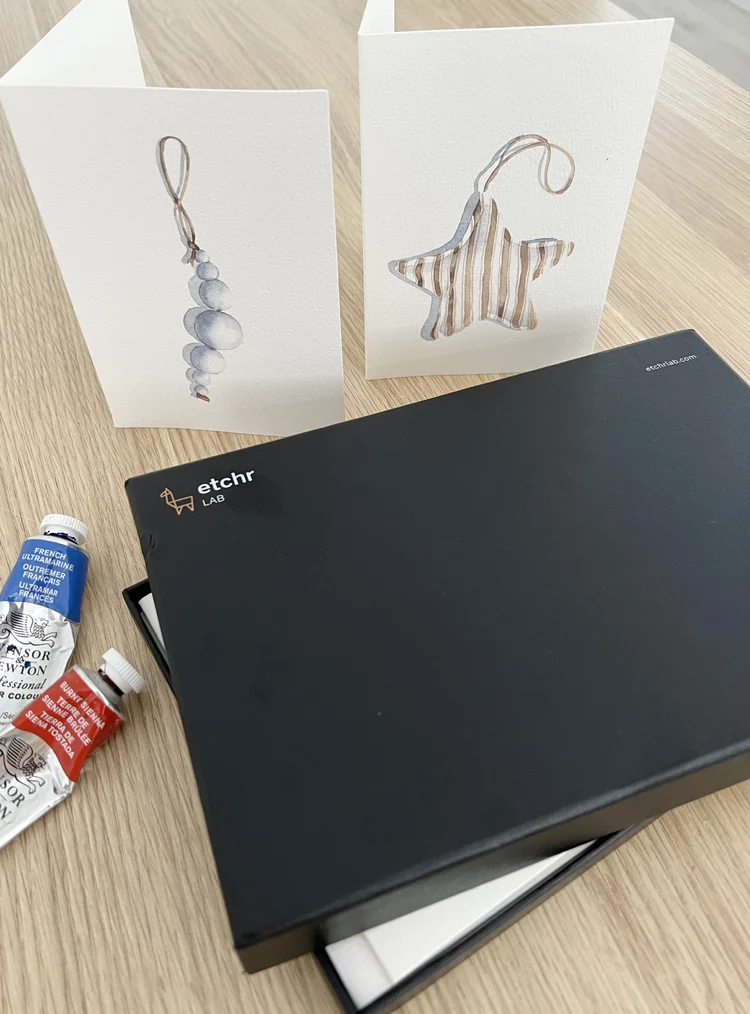
The Palette
For both pieces, I’m using a very limited palette of only Burnt Sienna and French Ultramarine Blue on Etchr 100% cotton greeting cards. When combined, these two create my absolute favorite gray mix. Of course, feel free to use your own favorite gray or shades of light and dark brown!
These cards are quick, gentle, and relaxing to paint. They are also a wonderful way to practice:
Water and pigment control
Wet-on-wet techniques
Creating soft, blended edges
Mixing neutrals
Adding subtle, natural shadows
Best of all? You won’t need any masking fluid for these designs, which is always a win in my book!
Materials You’ll Need
While any watercolor paper will work, here is exactly what I used for these holiday paintings:
Paper: Etchr cold-pressed greeting cards (100% cotton, 300 gsm). The card fronts are about 4 x 6 inches (10.5 × 15 cm).
Colors: Burnt Sienna and French Ultramarine.
Brushes: A No. 3 Round brush and a tiny detail brush (Size 0).
Basics: A water container, paper towels, a pencil, and an eraser.
Optional: A hairdryer (very helpful for speeding up the drying time!).
Card #1: Painting the Striped Star Ornament
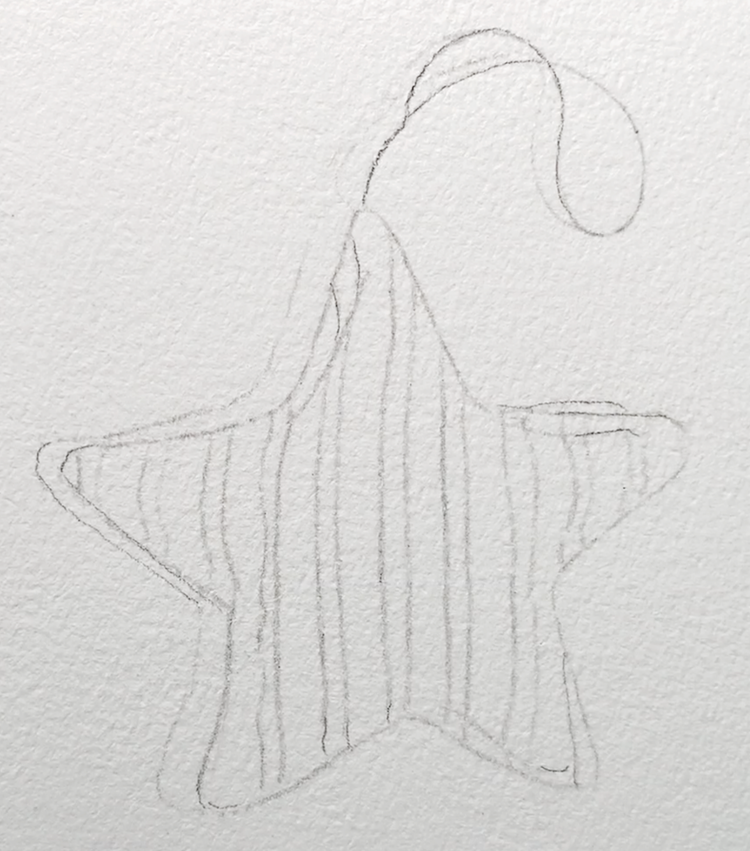
1. Sketching and Preparing the Design
For our first painting, lightly sketch a simple star shape on the front of your card. Keep your pencil marks very light so they are barely visible. Inside the star, draw a smaller line that runs parallel to the inner edge. This little “seam” is what gives the star its soft, stuffed-fabric look later on!
Preparing and Painting the Shadows Before you add any color, prepare your neutral gray:
- Mix Burnt Sienna and French Ultramarine.
- Add a little more Ultramarine to cool the mixture down.
This gray will be your primary shadow color. Using your No. 3 brush, paint a thin line of clean water along the “seam” you sketched earlier. This pre-wetting ensures your shadows stay soft and blurry.
Gently touch your gray mix to the damp paper. You don’t need to push the paint around—the pigment will spread on its own! Move around the star and repeat this anywhere you want the shape to dip inward. Think of where fabric would naturally crease, like near the inner angles and along the edges.
Pro Tip: If the gray spreads too far, just rinse your brush, blot it on a paper towel, and use the damp bristles to “lift” or soften the shape.
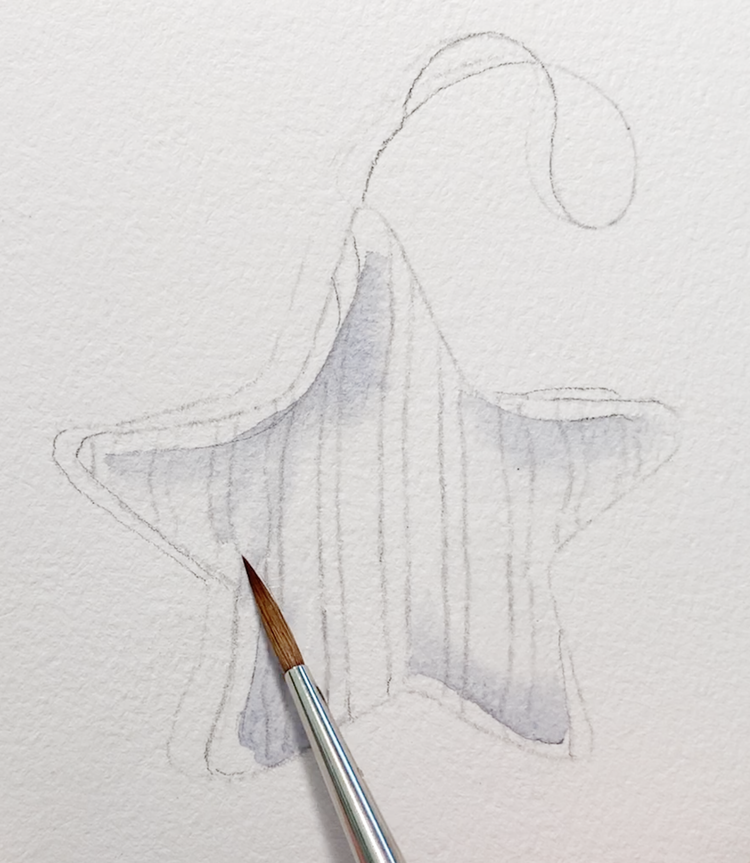
Painting the grey shadows on wet paper.
2. Painting the Brown Stripes
Next, mix a warm brown using mostly Burnt Sienna with just a tiny touch of French Ultramarine.
Make sure your paper is completely dry for this step. On the dry surface, paint:
- The small hanging string at the top.
- The wide brown stripes across the star.
Why dry paper? Painting on a dry surface keeps your edges clean and sharp. Since we want these stripes to look defined, we aren’t pre-wetting the paper this time!
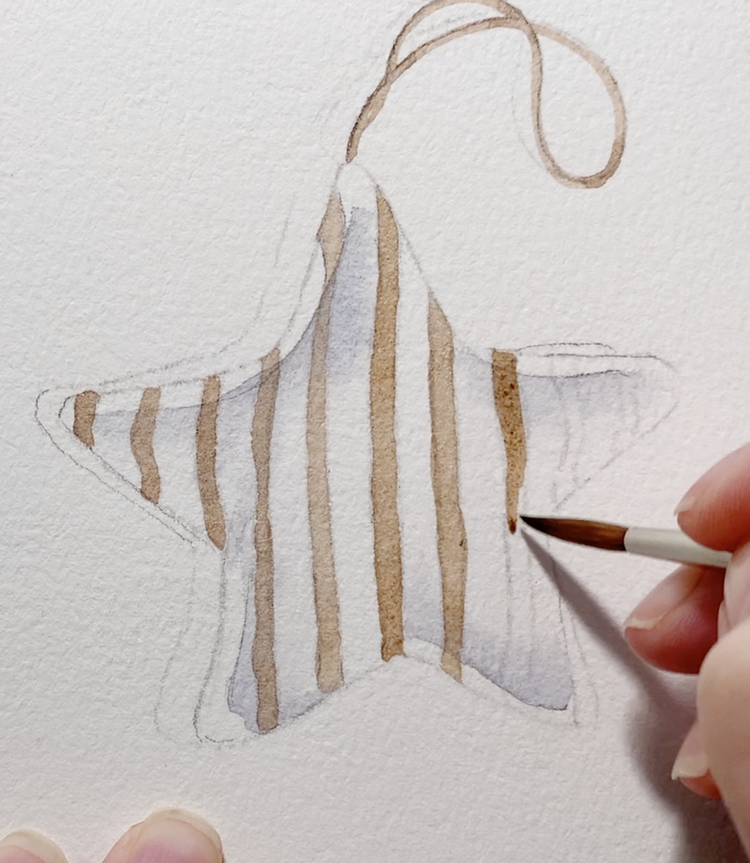
I start by painting simple long brush strokes on dry paper.
3. Adding Depth and Detail
When your painting is completely dry (feel free to use a hairdryer here), create a darker brown by using more pigment and less water.
This richer mix is perfect for:
- The areas where the star folds inward.
- The deeper parts of the “seam” line.
- The shadowy creases between the stripes.
To get those soft transitions: Lightly re-wet the specific area you want to shade with clean water, then “drop” the darker color in while the paper is still damp. This creates a gentle gradient that makes the star look padded and three-dimensional!
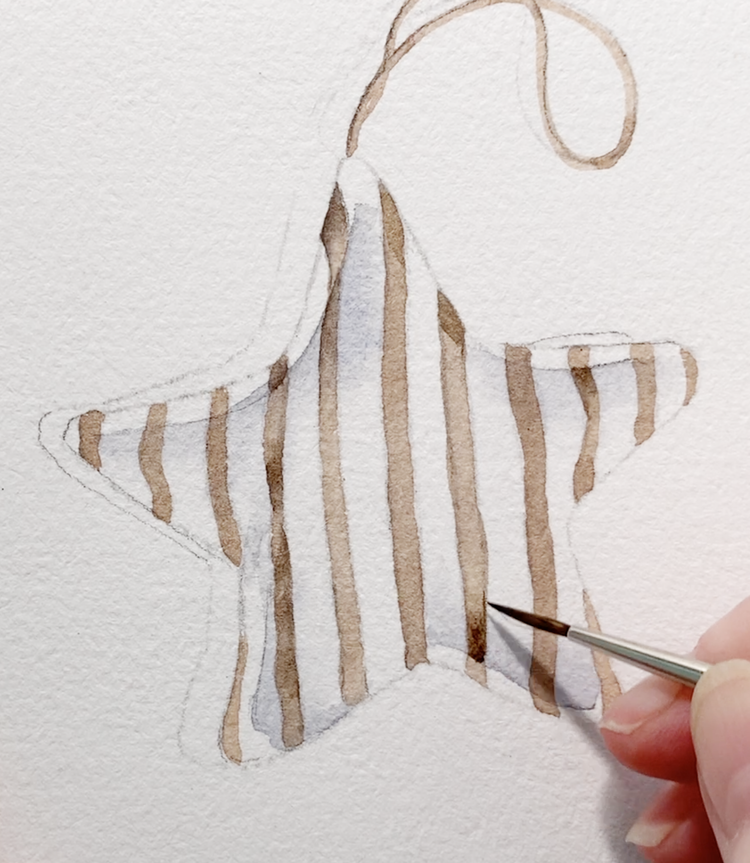
Adding the dark shadow areas on the stripes.
Now return to your original grey mix and paint the cast shadow beneath the star. Keep it soft and subtle, just enough to ground the ornament so it doesn’t appear to float.
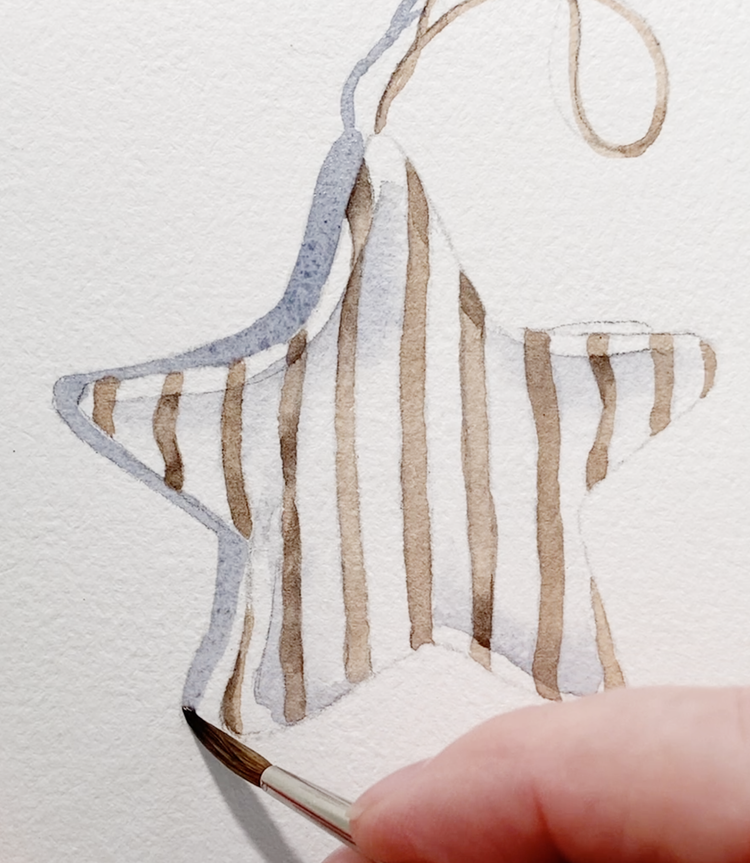
Painting the cast shadow on dry paper.
Once everything is completely dry, go ahead and erase any faint pencil lines that are still showing.
Using your same brown mix—this time with your tiny detail brush—paint the thin, delicate lines sitting right next to each wide stripe. These tiny details are what truly bring the star to life and make the pattern look intentionally crafted and professional!
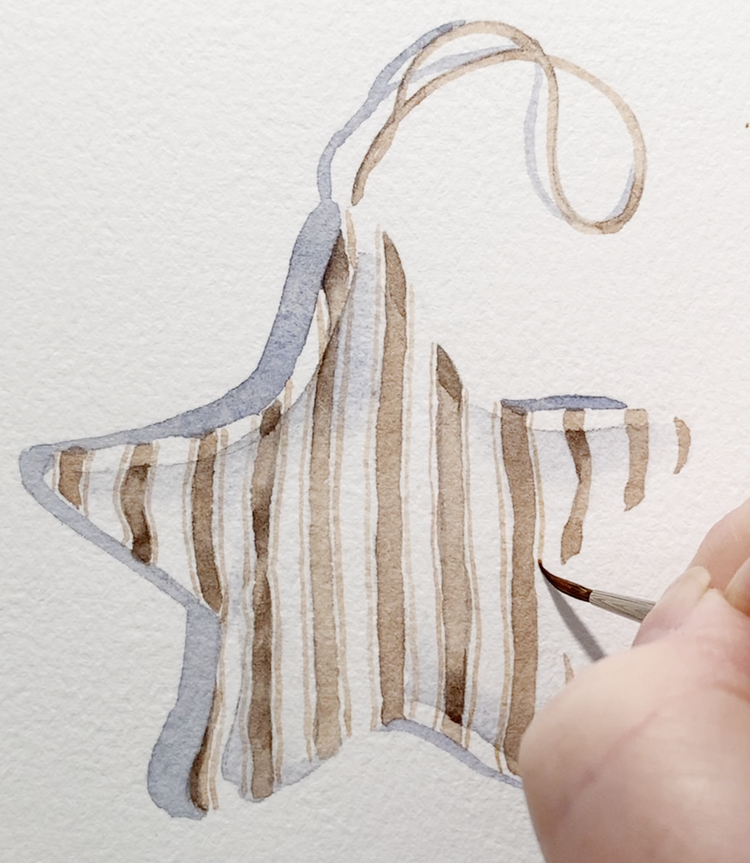
Painting the second, thinner, stripe.
At this point, your striped star card is complete: simple, warm, and delightfully soft-looking.
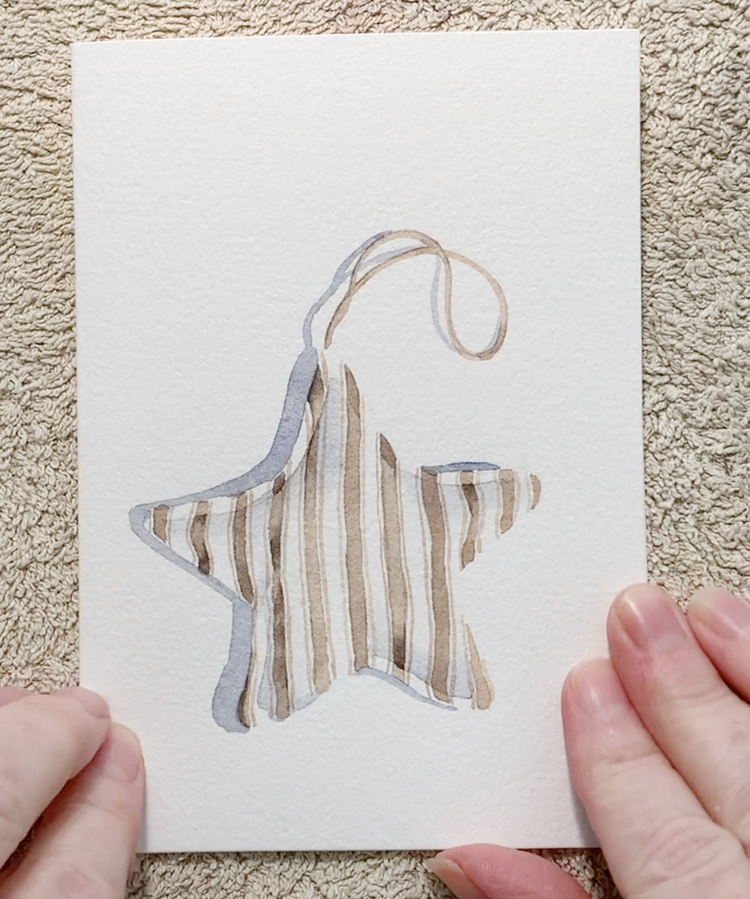
Here is the finished star.
Card #2: Painting the Wooden Bead Ornament
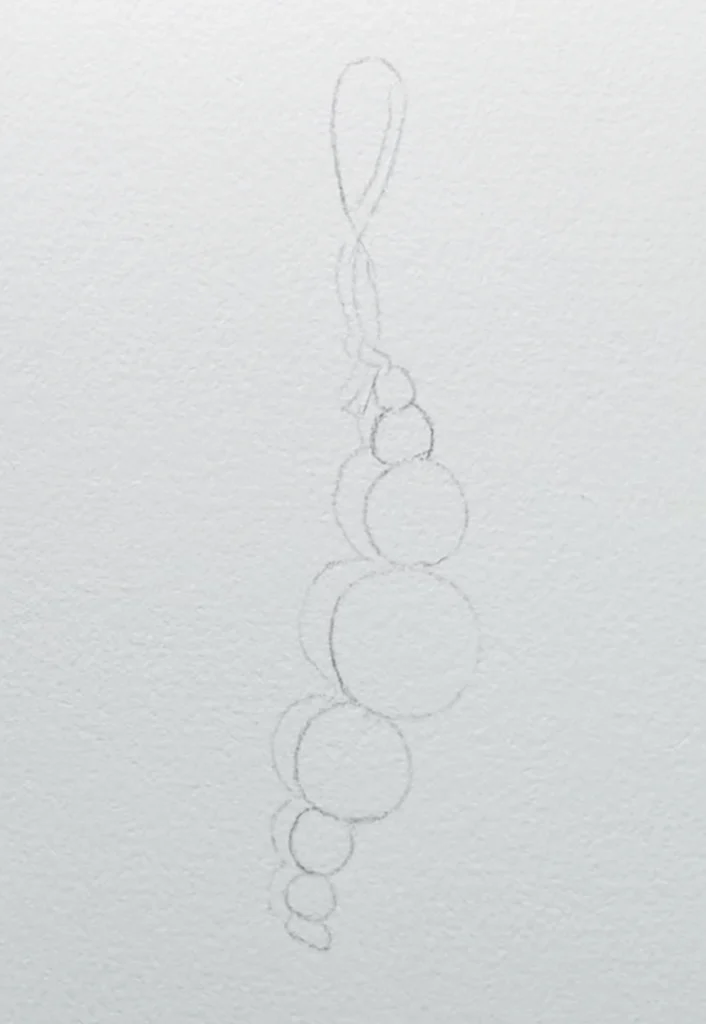
A simple line drawing of the ornament on the card.
1. Painting the String
Start with that same warm brown mixture you used for the star. Using your fine Size 0 brush, paint the top string in one smooth, steady line.
Next, add the tiny segments of string that show up between each bead. These little touches are small, but they’re important—they help define the spacing of your beads and give the ornament its structure before you even start the circles!
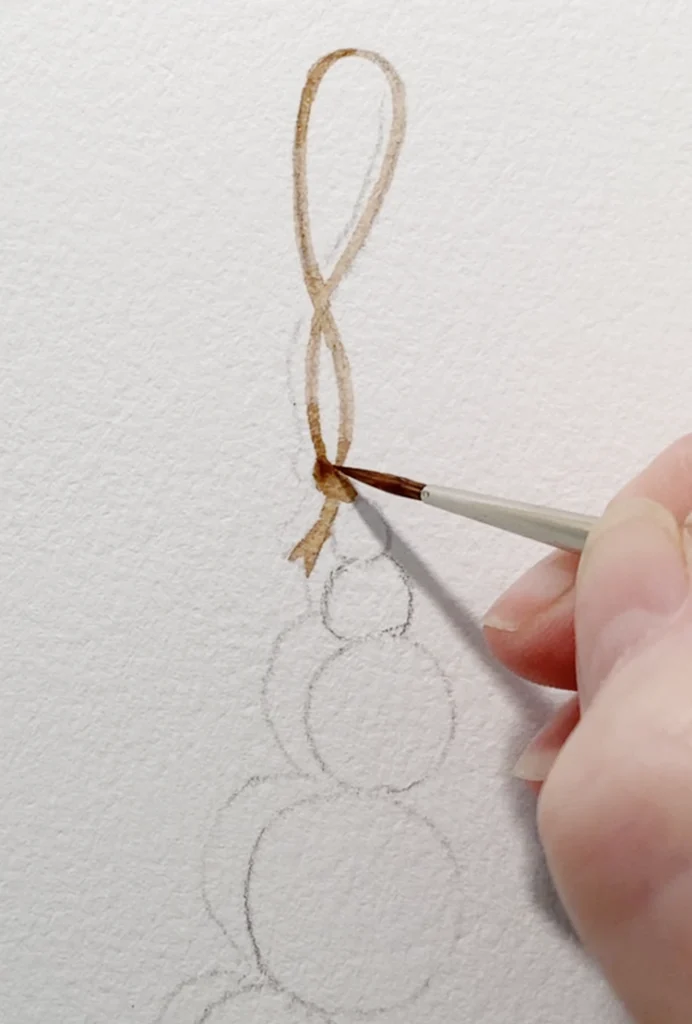
Painting the string on dry paper.
2. Soft Shading on the Beads
To keep the beads looking distinct and round, it’s important to paint each bead separately. This prevents the colors from bleeding into one another and keeps your edges crisp.
For each individual bead, follow these steps:
Wet the circle with clean water: Aim for a thin, even sheen. You want the paper to be damp, but without any puddles.
Drop in your cool gray mix: Apply the pigment along the upper-left edge. This will naturally become the shadow side of your bead.
Let the paint move: Let the pigment softly drift across the damp surface on its own. Resist the urge to overwork it with your brush; the best, softest gradients happen when you let the watercolor do its thing!
Manage the flow: If the color travels too far across the bead, use a clean, blotted brush to gently “lift” or wipe the excess pigment away.
Pro Tip: To work faster without making a mess, skip the bead right next to the one you just painted. This gives the first bead time to dry while you work on the next one over, preventing any accidental blending.
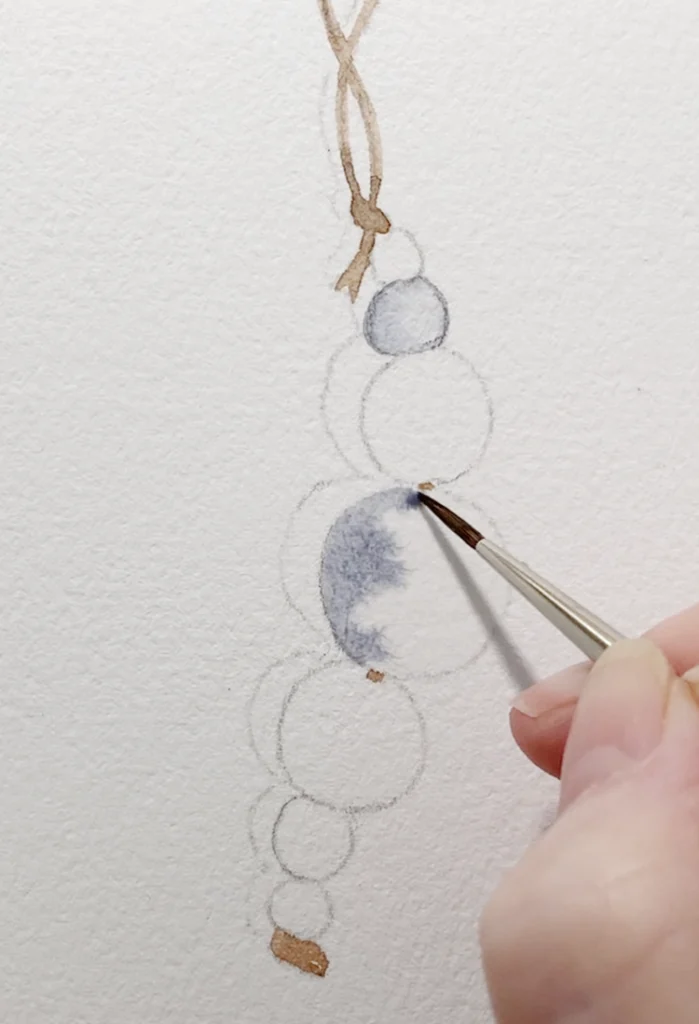
Working wet on wet to paint the shadows on the beads.
3. Painting the Cast Shadow
Using the gray mixture you have left, it’s time to paint the cast shadow behind the string and beads. This is what really makes the ornament “pop” off the page!
Because this shadow needs to be narrow and very precise, you’ll want to apply it on dry paper using your Size 0 detail brush. A steady hand and a slow, patient pace will make this step much easier. This final touch adds a wonderful sense of realism to your card.
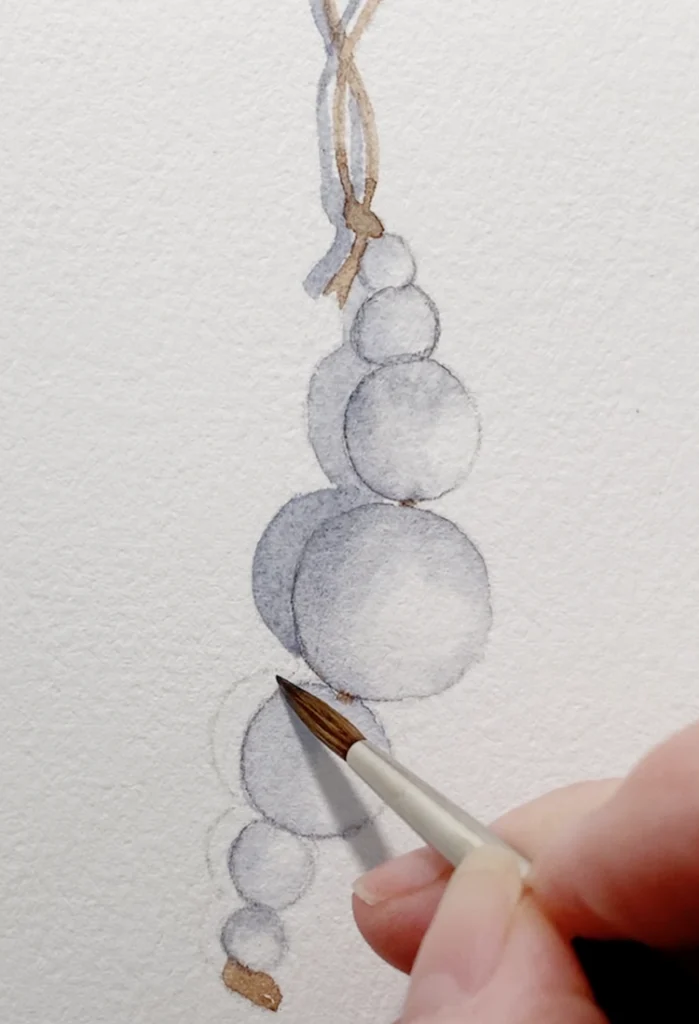
Painting the cast shadow on dry paper.
4. Adding a Second Layer of Shadow
Once your cast shadow is completely dry, it’s time to go back in with a stronger gray—this means using more pigment and much less water in your mix.
Apply this darker value on the same shadow side (the upper-left) as you did before. This second layer is the “secret sauce” that turns flat circles into true, 3D spheres.
Keep it subtle: Use small brushstrokes and keep the edges soft.
Protect the light: Be sure to leave the highlight area (the opposite side) clear of any color. That white of the paper is what creates the “glow.”
Work carefully: Move through the entire string of beads, drying each section as needed to make sure your layers stay crisp and don’t muddy together.

A second layer of colour on the shadows of the beads.
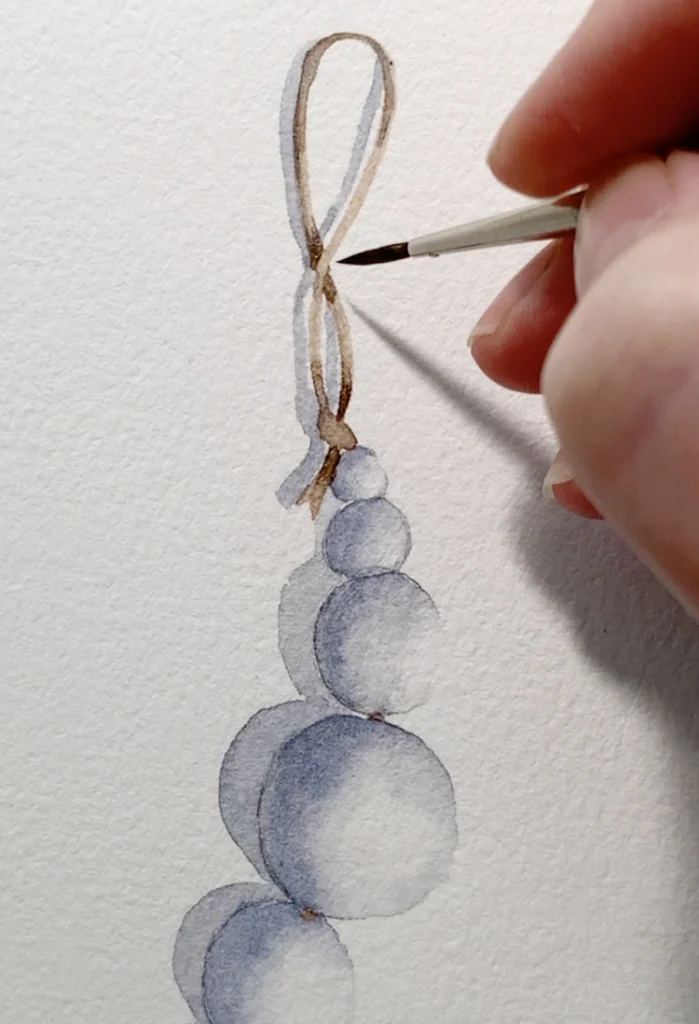
5. Final Details
To enrich the tones and bring the whole card together, take a touch of your darkest brown mixture and add it to the deepest shadows on the string and where the string meets the beads.
Finally, check your edges—if any look a little too sharp or “harsh,” use a slightly damp brush to soften them out. Let the card dry completely. Your second ornament is finished—a delicate, warm, and beautifully understated watercolor Christmas card!
Adding shadow on the string.
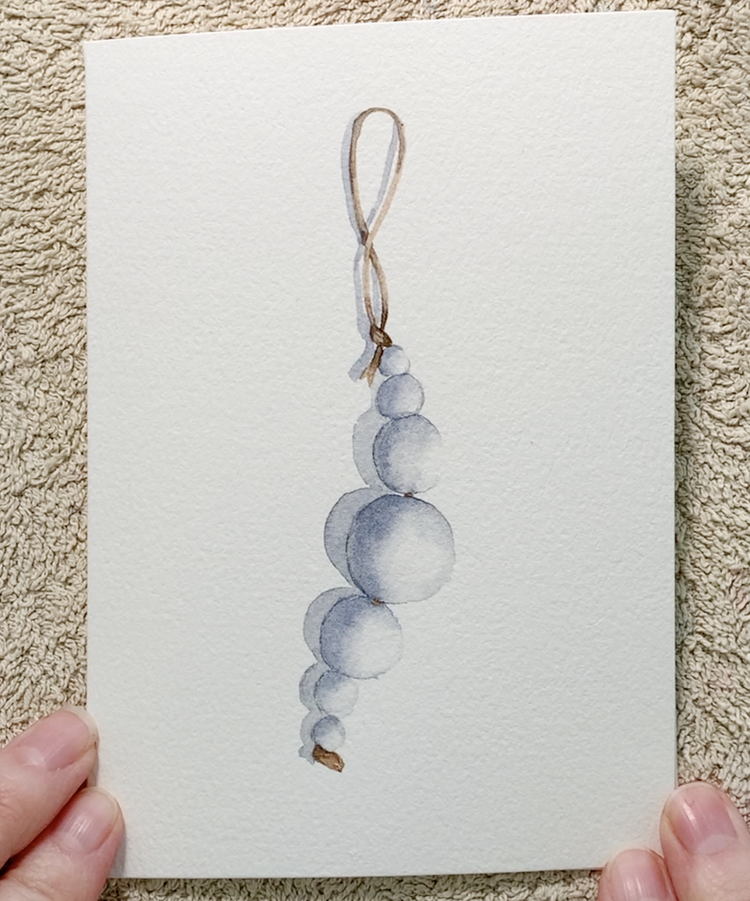
Finished.
Have a wonderful Watercolor Christmas!
These two card projects are such a simple and fun way to celebrate the season. With just two colors, a couple of brushes, and a patient approach to your shadows, you can create something truly heartfelt and personal.
I hope these steps help you follow along easily and that you feel inspired to get your brushes moving! I genuinely can’t wait to see the Christmas cards you create.
Happy painting, and happy holidays! 🎄✨